 Tracé
de Circuit Imprimé
Tracé
de Circuit Imprimé
Version 3.1
by Bruno Urbani SPAMb.urbaniSTOPspam at spamfree.fr
http://b.urbani.free.fr/
Translated to English by James Newton. After installing the French version, replace the files with these: tci.exe, empreintes sds
update: The version on Bruno's site is now 3.5. I'm not sure the translated version 3.1 will still work. I've tried to email Bruno, but I aways get:
This Message was undeliverable due to the following reason: Recipient: <b.urbani@free.fr> Reason: user quota exceeded
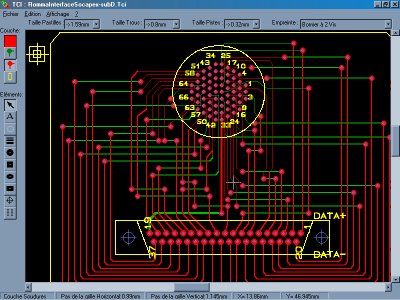
This software is designed to draw printed circuits manually, and to output the drawing on printer, paper or transparency (ready to be transferred and etched!) or to Gerber / Excellon files for a professional board house.
The dimension of the circuit are limited to a A4 sheet or 270x195mm (useful zone).
Version 3 now produces Gerbers (standard RS-274X), and Excellon files for drilling (format 2).
This software manages 3 layers:
It respects conventions of Windows, and so is quick to learn (10 Minutes)
Note: if you hold down the key ' C ' while you move the mouse, look at what happens!
Choose the diameter of the pad, as well as the size of the hole in the drop-down lists, and click on the shape of desired pad. Then drop the pad by clicking with the left button of the mouse. To stop, click with the right button of the mouse or press on the 'Esc' key.
The pads appear simultaneously on the 2 layers. You can turn the oval and rectangular pads by pressing on 'R'.
Note: if you choose a hole larger than the pad, it disappears in the hole!!!!!!! (black holes are scary!)
Choose the width of the track in the drop-down list, as well as the layer and click on the button with the different bar widths. Then click on the drawing to place the beginning of the track, move the mouse along the track, clicking to change direction etc. To finish the track, click with the right button of the mouse or press on the key 'Echap'.
To leave this mode double click with the right button of the mouse.
Click on the button with the "A". A window appears, type your text and press on the 'OK' button, a rectangle symbolizing the text appears, place at the point desired and click with the left button of the mouse. To stop click with the right button of the mouse or press on the key 'Echap'.
Select the screen print layer, and choose the size of the circle with the drop-down list 'Pad size', then Click on the circle button, and place your circle just like the pads.
The pads are selected while clicking on their center. The tracks are selected while clicking on their ends. You can select several elements by drawing a rectangle, by dragging the mouse.
Note: once you have made a selection, you can affect this selection with the contextual menu (click with the right button) or with the Edit menu.
When several elements are superimposed such as for example the end of one track and the center of a pad, you can dissociate them: While pressing on the 'Shift' key and while clicking successively, the elements appear selected one by one. It is then very easy to separate them. You can use this function to obtain information on an element in particular, with the menu 'Edit' and 'Information'.
Note: if 2 identical pads are superimposed, the selection of the second, makes the first disappear, and you should then erase one of the 2 with this method.
In the menu "Setup" you can select the layers which you wish to see (new in v3.1). When the circuit is complex, it is very interesting to view one layer at a time, to clarify visualization.
Very easy: Draw your print as if you were making a printed circuit and save it with extension 'EMP' in the file save as '\Empreintes'. Think of possibly modifying the step of the grid. The new component will appear automatically in the drop-down list. To remove a component; erase this file. To modify a component template, open the corresponding .EMP file and modify it. If you develop new prints, send them to me to l adress: b.urbani@free.fr I would place them at the disposal of all!
Version 3 allows color printing (if you have a color printer!) that makes it possible to check its circuit more easily for errors by offering a global vision. If you print to double scale or more, think of placing your circuit in top and on the left of the screen, if not it will be truncated on the printout!
to obtain very black tracks, you must:
An easy way given by a user of IPC: to save transparencies, you can record your circuit with the extension 'EMP', this will allow you to use it like a component, and you will be able to print several circuits on one transparency.
The Gerber files are standard RS-274X (a file by layer) and make it possible to produce offset films by phototracer with the exact dimension. In the same way, the Excellon files (Format 2) are for drilling with numerical control.
Certain informed users point out that their Gerber files provided tracks of null width: A track of 0.3mm must appear in the Gerber file like 0.3 and not 0,3. It is necessary that the decimal separator of Windows is configured like a point "." and not a comma. To do this: go in "Start" then "Control Panel" then "Regional Settings" and click on "Numbers" and at the heading "decimal symbole" put a point "." and not a comma.
Your printer must be configured in 600DPI if not, you will have an printout at double size. If your printer prints in an incomplete way, then that unfortunately means that it does not manage certain graphic functions (I can't do anything!) . In this case, try to charge a more recent printer.
This software was completely written in Visual BASIC 6 Service Pack 5.
Configuration minimum: Pentium 166MHz 32Mo RAM Good
do-it-yourself!
Questions:
Bruno Urbani also produced an excellent schematic drawing program. Did James Newton also translate that into English ? If not, could you please provide a method of contacting him.James Newton of Massmind replies: We have no way of contacting him, except via his web site listed on the page above.+
Kind Regards - Stephen Just, Melbourne, Australia
| file: /Techref/app/tci.htm, 8KB, , updated: 2009/10/6 17:19, local time: 2025/4/30 00:58,
13.59.173.30:LOG IN
|
| ©2025 These pages are served without commercial sponsorship. (No popup ads, etc...).Bandwidth abuse increases hosting cost forcing sponsorship or shutdown. This server aggressively defends against automated copying for any reason including offline viewing, duplication, etc... Please respect this requirement and DO NOT RIP THIS SITE. Questions? <A HREF="http://www.sxlist.com/techref/app/tci.htm"> Tracé de Circuit Imprimé </A> |
| Did you find what you needed? |
Welcome to sxlist.com!sales, advertizing, & kind contributors just like you! Please don't rip/copy (here's why Copies of the site on CD are available at minimal cost. |
|
Ashley Roll has put together a really nice little unit here. Leave off the MAX232 and keep these handy for the few times you need true RS232! |
.