| Adding images to pages | |
| To jazz up your pages, you
can add images. In fact, images aren't just for making pages attractive.
Remember that "a picture is worth a thousand words". Well, if you use the
right picture it can be -- and a lot more interesting than reading
a thousand words!
Of course, you should keep in mind the connection speeds your target readers probably have and make sure the file sizes of your images are reasonable. |

Images: [ Adding images | File
locations | Alignment |
Alternate Text | Resizing |
Horizontal rules | Colors and Background
images ]
|
|
|
You can also highlight and
copy images from any page on the Web (with
Edit
|
|
|
 Looking
for a good background image for your pages? You can find plenty of them on
the Web. Try
PrimeHost's
collection Looking
for a good background image for your pages? You can find plenty of them on
the Web. Try
PrimeHost's
collection |
|
|
|
Do your part to make downloading
images faster for visitors to your Web site. Keep the image file sizes reasonable
by making the images smaller or by restricting the number of colors in the
image.
|
|
|
 |
By the way, when you add an
image to a page, AOLpress automatically writes the width and height information
to the HTML it creates. In addition to letting you resize images, this size
information allows visitors to start scrolling through your pages while the
images are still loading.
|
|
|
|
|
For more information, see the chapter on
images
In the next
lesson you'll learn how to create links between pages. In fact, you'll
be able to link images to other locations and create image maps with links
to several places (like the one near the top of this page). Don't forget
to choose
File |
| file: /Techref/language/html/HELP/tutorial/images.htm, 18KB, , updated: 1997/3/23 18:29, local time: 2024/4/19 10:51,
3.133.12.172:LOG IN
|
| ©2024 These pages are served without commercial sponsorship. (No popup ads, etc...).Bandwidth abuse increases hosting cost forcing sponsorship or shutdown. This server aggressively defends against automated copying for any reason including offline viewing, duplication, etc... Please respect this requirement and DO NOT RIP THIS SITE. Questions? <A HREF="http://www.sxlist.com/Techref/language/html/HELP/tutorial/images.htm"> AOLpress: Adding images to pages</A> |
| Did you find what you needed? |
Welcome to sxlist.com!sales, advertizing, & kind contributors just like you! Please don't rip/copy (here's why Copies of the site on CD are available at minimal cost. |
Welcome to www.sxlist.com! |
.


 Bottom

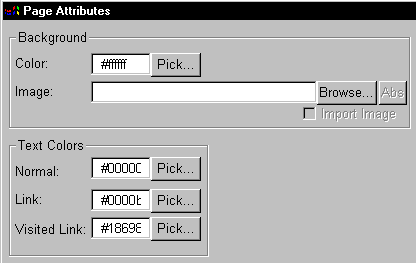 Click
the "Pick..." button next to one of the fields shown here.
Click
the "Pick..." button next to one of the fields shown here.